

20 Dec 09 How to use Labels in Gmail to Make Your Life Easy
How to use Labels in Gmail to Make Your Life Easy
I am a big fan of the label feature. Currently, I am using around 125 labels and filter combination to short my mails. Labels in Gmail are such a lifesaver. It helps us organize our mails and keep the inbox tidy. You can use label along with filter option to create a rule to categorize the mails and even remove them from your inbox. I will tell you how you can use the labels.
Create a label and a filter rule
This is the very first thing to do. Let’s say you have created a label called Sweetheart, and in the filter you mention that any mail from your sweetheart’s mail ID (even more than one) should go directly to that label skipping inbox, or simply apply the label to the mails coming from her.
Color code your labels
Like me, you can also color code your labels. It makes it easy to visually scan through the kind of stuff is there. Like all my SEO newsletters have Orange code, online marketing ones has red code, and all my writing related newsletters has blue code. This has helped me visually scan through the labels.
Activate Hide read labels from Gmail lab
Click settings (you can find it near logout link in Gmail) followed by lab then scroll down to find “Hide read labels”. Enable this feature. This will help you keep the sidebar clutter free, and only labels with unread mails will be visible to you.
Using labels to search
You can also use labels as a shortcut to reach the mail you want. For this, you will need to enable “Go to label” feature from settings >> lab. (See pic for detail).

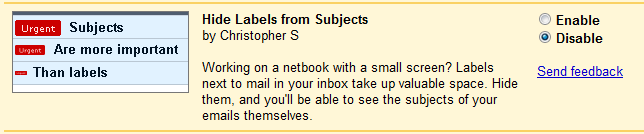
Hide Labels from subject
I personally do not like hiding labels from subjects, but not everyone shares the same view, therefore, Google has this feature to hide labels from subjects. To activate this, go to settings and then to lab, search for “Hide Labels from Subjects” and enable it (see pic). That is all you need to do, if you do not like seeing colorful labels beside subjects.

Tags: Clutter, Colorful Labels, Filter Combination, Filter Option, Free Labels, Gmail, Google, Inbox, Lifesaver, Mail Id, Marketing, Orange, Sweetheart, Unread Mails
21 Oct 09 Secure Your Yahoo Mail
In the last blog post, we talked about how you can secure your Gmail, and in this article, I will show you the way to secure your Yahoo mail. Before we can begin, let me tell you that Yahoo mail cannot be as secure as Gmail because it does not use Https for the entire e-mail. The login process in Yahoo! Accounts (like Mail, Calendar, Flickr, and other Yahoo sites) is secure, as login to any Yahoo services happen on a secure domain (Https), but the rest of the mail feature is not so secure.
Securing Yahoo mail is somewhat manual process. You need to look for Https prefix before you feed your e-mail ID and password in the Yahoo form. If the page doesn’t have Http then you have opened a phishing site (or have been redirected to one). It means, someone out there is trying to trick you.
Along with this, you can also take the following steps to keep your Yahoo mail secure:
- Create your personalized Yahoo Sign in Seal. This let you create a custom login page using either text or image of your choice. But there is a limitation to this. The custom login page that you will create will be visible on only the system on which you will create it.
- If you use a browser that supports Greasemonkey scripts then install the HTTP-to-HTTPS redirector. Firefox, Opera, Chrome (recent build), and Flock supports Greasemonkey scripts.
This way you will make sure that you are always on the Https page of Yahoo. There is one more way to secure your Yahoo mail, and that is password time out feature of Yahoo. This will protect all your Yahoo accounts. Follow the steps given below to set your password timeout.
Step 1: Login to your Yahoo
Step 2: Go to My Account. You can find a link to my account at the top of the screen.
Step 3: You will be asked to enter the password again, after which you will be taken to account information page.
Step 4: Go to “Member Information” and click “Edit”.
Step 5: Click the drop-down with a label “Prompt for Password” and change the setting. 15 minutes is the shortest duration after which you will be prompted to enter the password again. Set the duration for 1 hour. This will ask for password after a set duration.
Tags: E Mail, Flickr, Flock, Gmail, Greasemonkey Scripts, Information Page, Mail Feature, Mail Id, Mail Password, Mail Yahoo, Page Doesn, Prefix, Secure Mail, Step 1, Step 3, Time Out, Yahoo Accounts, Yahoo Mail, Yahoo Services, Yahoo Step

